Environment
Reflection for Secure IT Windows Server version 7.1 or higher
Reflection for Secure IT UNIX Server version 7.1 or higher
Situation
This technical note describes how to connect from a Reflection for Secure IT Windows Client 7.1 or higher to a Reflection for Secure IT Windows or UNIX Server 7.1 or higher using certificate authentication. You will use the certificate generation utility on the Reflection for Secure IT Windows Server to create a certificate request and convert the resulting signed certificate and private key into the proper format.
Note: This note is intended for server administrators who are generating certificates for users. Instructions apply to the certificate generation utility, ssh-certtool, which is available beginning in Reflection for Secure IT Windows Server version 7.1. The ssh-certtool utility is not available in the Windows client product.
Resolution
Certificate Authentication Overview
Certificate authentication is one way a server can authenticate a user. It requires the following:
- A client PKCS12 (.pfx or .p12) certificate package.
- The Trusted Root Certificate Authority (CA) certificate.
- Reflection for Secure IT Server 7.1 or higher uses a utility called Reflection PKI Services Manager to provide the X.509 certificate validation. The PKI Services Manager is available for either a Windows or UNIX environment. See KB 7021870, “Reflection PKI Services Manager Overview,” for more information.
Overview of Configuration Steps
Configuring Reflection for Secure IT Windows Client for certificate authentication is a multi-step process:
- Generate a certificate request using the ssh-certtool utility on the Reflection SSH Windows server and send it to a Certificate Authority (CA). The CA sends you your signed certificate and their Trusted Root CA Certificate.
- Create a PKCS12 package with your private key and the signed certificate sent to you by the CA.
- Configure the client to store and use certificates.
- Configure Certificate User Authorization on the Reflection for Secure IT Server
A. Generate a Certificate Request
Use the ssh-certtool utility to generate a certificate for the Reflection client. The steps vary depending on certificate type, extensions, and other factors, including how you choose to sign your certificates. For more information about the ssh-certtool utility, see the Reflection for Secure IT Windows Server documentation, https://support.microfocus.com/manuals/rsit_win_server.html.
Note: Use the ssh-certtool utility in Reflection for Secure IT Window Server 7.1 or higher to generate a certificate request.
- In a DOS command window, enter the path to the ssh-certtool, which is typically found in the C:\Program Files\Attachmate\RSecureServer folder on the Reflection for Secure IT server.
- Enter this command to generate a certificate request that you can send to your Certificate Authority for signing:
ssh-certtool –n <rsa or dsa> -o <output file name> req CN=<"User Name">,O=<Company>,OU=<OrganizationalUnit>,L=<City>,ST=<State>,C=<Country>For example:
ssh-certool –n rsa -o user1 req CN="User Name",O=Attachmate,OU=Support,L=Seattle,ST=Washington,C=USThe e-mail address can also be added to the Subject Alternative Name by including the option:
-z email=user@example.comFor example:
ssh-certtool -n rsa -o user1 -z email=UserName@myCo.com req CN="User Name",O=Attachmate,OU=support,L=Seattle,ST=Washington,C=US- The ssh-certtool utility generates two files:
user1.pkcs10 (the certificate request)
- Send the resulting pkcs10 file (in our example, user1.pkcs10) to your Certificate Authority for signing.
If you are using Microsoft Certificate Services server as your Certificate Authority, you can open the file in a text editor and then paste it into the request form.
- You will receive your CA-signed client certificate in a "Base-64 encoded" or ".pem" format depending on the CA. Either format is acceptable. Note: Do not use DER encoded binary format.
- Rename your CA-signed client certificate using a .crt extension, for example, user1.ssh2.crt.
B. Create a PKCS12 Package
After you receive your CA-signed client certificate from the Certificate Authority, you will need to create a PKCS12 package to import into the Microsoft Certificate Store or Reflection’s Certificate Store in version 7.0 or higher.
- On the Reflection SSH Windows server, generate the PKCS12 package using the following command:
ssh-certtool –o <output file name> pkcs12 <private_key> <Certificate>For example:
ssh-certtool –o user1 pkcs12 user1.ssh2 user1.ssh2.crt- When prompted, enter a passphrase that you will remember. Using an empty passphrase is not recommended because it is less secure.
The command creates a file called user1.p12.
C. Configure the Client to Store and Use Certificates
You can configure the client to store and use certificates from either the Microsoft Certificate Store or Reflection's certificate store.
Using the Microsoft Certificate Store
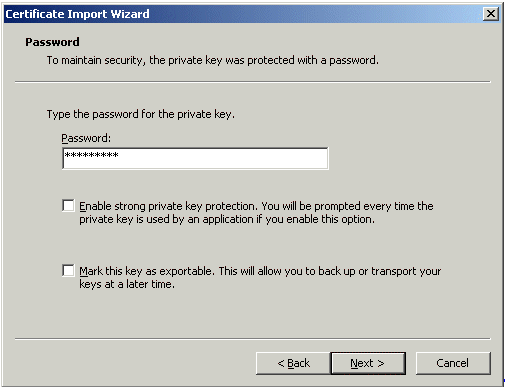
- Double-click the file you created (in our example, user1.p12) to install it to the Microsoft Certificate Store. When prompted for the password, use the passphrase that you entered in step 2 of B. Create a PKCS12 Package. Accept the default option and complete the import.
- In the Reflection for Secure IT client, open the Connection > Connection Setup dialog box.
- Enter a host name and user name to enable the Security button. Click the button to open the Reflection Secure Shell Settings dialog box.
- On the General tab, under User Authentication, clear Keyboard Interactive, Password, and GSSAPI/Kerberos, leaving Public Key as the only selected option.
- Click the User Keys tab and select the client certificate that you created in B. Create a PKCS12 Package with your private key and signed public key (in our example, user1.p12).
- If you are running version 7.0.x, on the Encryption tab, under Signature types, change RSA from the default MD5 to SHA1. Beginning in version 7.1, the default is SHA1.
- Click OK and save your settings.
Using Reflection's Certificate Store
- In the Reflection for Secure IT client, open the Connection > Connection Setup dialog box.
- Enter a host name and user name to enable the Security button. Click the button to open the Reflection Secure Shell Settings dialog box.
- On the General tab, under User Authentication, clear Keyboard Interactive, Password, and GSSAPI/Kerberos, leaving Public Key as the only selected option.
- On the PKI tab, click the Reflection Certificate Manager button.
- In the Reflection Certificate Manager button, on the Personal tab, click the Import button.
- Select the client certificate that you created in B. Create a PKCS12 Package with your private key and signed public key (in our example, user1.p12). Follow the prompts to import your certificate.
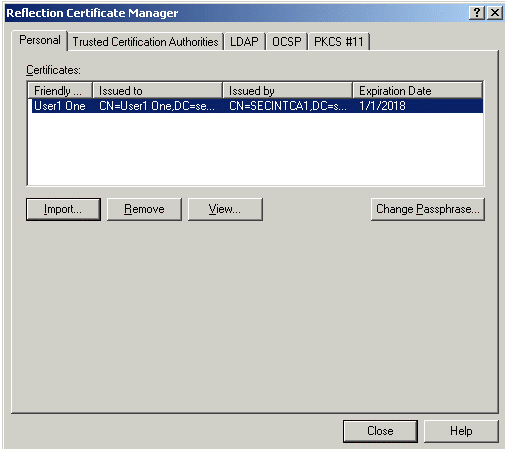
- Click Close.
- If you are running version 7.0.x, on the Encryption tab, under Signature types, change RSA from the default MD5 to SHA1. Beginning in version 7.1, the default is SHA1.
- Click OK.
- Click the Security button to open the Reflection Secure Shell Settings dialog box.
- On the User Keys tab, select the certificate imported in step 6. Note that the location of the key is the Reflection Certificate Store.
- Click OK.
D. Configure Certificate User Authorization on the Reflection for Secure IT Server
Beginning in version 7.1, both Reflection for Secure IT Windows Server and UNIX Server use the Reflection PKI Services Manager to provide X.509 certificate validation services. The PKI Services Manager is available for either the Windows or the UNIX environment. See KB 7021870, “Reflection PKI Services Manager Overview,” for more information.
Configuring Reflection for Secure IT UNIX Server 7.1or Higher
Configuring Reflection for Secure IT Windows Server 7.1 or Higher
Follow these steps to configure Reflection for Secure IT Windows Server to use the PKI Services Manager validation services.
- Launch the Reflection for Secure IT Windows Server console and click the Configuration tab.
- In the left pane, navigate to Authentication > Public Key > Certificates.
- In the PKI server field, if the PKI Services Manager is installed on the same Windows server, accept the default settings.
If PKI Services Manager is installed on a different server, enter the IP address or host name (for example, winpkiserv1); and in the Port field, specify port 18081.
- If the PKI Services Manager is installed on the same Windows server, you can browse to the key file. By default, the public key is called pki_key.pub. Its default location is C:\Documents and Settings\All Users\Application Data\Attachmate\ReflectionPKI\config.
If PKI Service Manager is installed on a different system, obtain a copy of the pki_key.pub from the PKI Service Manager and store it on the Reflection for Secure IT Windows Server.
- Click the Verify connection button to confirm that you can establish a connection to the PKI server.
- Click the Save button or click File > Save to save the PKI settings.
- Click Action > Restart Server.
Configuring Reflection for Secure IT UNIX Server 7.1 or Higher
The steps to configure Reflection for Secure IT UNIX Server depend on whether the Reflection for Secure IT UNIX Server and the PKI Services Manager are installed on different machines or on the same machine.
Different Machines: Follow these steps if Reflection for Secure IT UNIX Server and PKI Services Manager are installed on different machines.
- Determine the IP Address of the PKI Services Manager.
- Download a copy of the PKI Services Manager’s public key. The default public key name is pki_key.pub.
- Transfer the pki_key.pub to /opt/attachmate/pkid/config onto the UNIX server.
- In the /etc/ssh2/sshd2_config file, edit the PkidAddress line with the PKI Service Manager’s IP address.
- Uncomment both PkidAddress and PkidPublickey lines. For example:
### Add PkidAddress and pkiPublickey for testing##PkidAddress=10.10.1.216:18081PkidPublicKey=/opt/attachmate/pkid/config/pki_key.pub####- Save the config file.
Same Machine: Follow these steps to configure Reflection for Secure IT UNIX Server to use the PKI Services Manager validation services.
- In the /etc/ssh2/sshd2_config file, uncomment both PkidAddress and PkidPublickey lines, keeping the defaults. For example:
### Add PkidAddress and pkiPublickey for testing##PkidAddress=localhost:18081PkidPublicKey=/opt/attachmate/pkid/config/pki_key.pub####- Save the config file.
Now your Reflection for Secure IT Windows Client is configured to support Client Certificate Authentication. For information about configuring Reflection for Secure IT Windows Server for Server Certificate Authentication, see KB 7022019.
About Trusted Root CA Certificates
A certificate issued by a Certification Authority (CA) to itself is called a self-signed Trusted Root certificate; it is the anchor point for a chain of trust. When one entity uses a certificate to authenticate itself, the other entity must verify the trust relationship between the first entity's certificate and the Trusted Root CA that is at the beginning of the chain of trust.
For example, if a user is presenting a certificate to authenticate themselves to the server, the server needs to verify two conditions:
- User has the private key for the public key contained in the certificate and can correctly sign an authentication message.
- The signatures of any intermediate CA certificates are valid all the way to the Trusted Root CA.
This second validation requires that the Trusted Root certificate for the user's certificate resides in the Trusted Root store on the server and that any intermediate CA certificates can be obtained.