Environment
Reflection for Secure IT UNIX Server version 7.2 or higher
Situation
Resolution
Public key authentication overview
Public key authentication is one way a server can authenticate a user. It requires a private and public key pair; the private key is located on the client, and the public key must be uploaded to the SSH server.
Note: If you are using the Reflection SSH Windows Server, you must have a local user account or domain account on the Windows server.
Key Formats
When a key pair is created on an SSH client, each key of the key pair—public and private—is written to a separate file in a particular format. The format generated by the OpenSSH client is compatible with Reflection for Secure IT Server version 7.x or higher, so no conversion is required. However, OpenSSH key is not compatible with Reflection for Secure IT version 6.x, so you must convert the public key to the proper format prior to uploading it to version 6.x server.
Use the OpenSSH client key generation utility
Use the OpenSSH key generation utility to generate a key pair. The steps vary depending on whether you use a default name (id_dsa or id_rsa) and location, or you use a non-default name or location when you generate a key pair:
Generate a key pair with a non-default name or in a non-default location
Generate a key pair with a default name and location
When using public key authentication, the OpenSSH client by default looks for a private key named id_dsa or id_rsa in the $HOME/.ssh directory.
- On the system running the OpenSSH client, change directories to .ssh. If the .ssh directory does not exist, create it.
- Use the following command to create a key pair:
ssh-keygen –t <rsa or dsa>Note: You must use the –t switch and specify a type, rsa or dsa. To see a list of available switches, use the command ssh-keygen -h, or check the man pages for more details.
The key generation utility will run for a few moments.
- Once the utility has generated the key pair, you are prompted to enter a file and the path in which to save the key. Accept the default file name and path.
- You are then prompted to enter and confirm a passphrase. If you want to create a passphrase-less key, press the Enter key twice without entering a passphrase.
- After entering a passphrase, the location and names of the private and public keys are displayed. For example (on Solaris):
Your identification has been saved in /export/home/user/.ssh/id_dsa.Your public key has been saved in /export/home/user/.ssh/id_dsa.pub.- Now that you have created the key pair, proceed to the section that describes how to upload the public key to the server
Generate a key pair with a non-default name or in a non-default location
If you create a key pair with a name other than id_dsa or id_rsa, or if you save a key pair to a non-default location you must create an entry in the user-specific config file or in the global ssh_config file that points to your private key. Follow these steps:
- On the system running the OpenSSH client, change directories to .ssh. If the .ssh directory does not exist, create it.
- Use the following command to create a key pair:
ssh-keygen –t <rsa or dsa>Note: You must use the –t switch and specify a type, rsa or dsa. To see a list of available switches, use the command ssh-keygen -h, or check the man pages for more details.
The key generation utility will run for a few moments.
- Once the utility has generated the key pair, you are prompted to enter a file and the path in which to save the key. Enter the file name and path you want.
- You are then prompted to enter and confirm a passphrase. If you want to create a passphrase-less key, press the Enter key twice without entering a passphrase.
- After entering a passphrase, the location and names of the private and public keys are displayed. For example:
Your identification has been saved in /export/home/user/.ssh/mykey.Your public key has been saved in /export/home/user/.ssh/mykey.pub.Note: If you store your keys in a non-default location, make sure that the directory is not accessible to anyone else. Use a command like the following:
chmod 744 <path to directory containing keys>- Once the key is generated, you must create an IdentityFile entry in either the user-specific config file or in the global ssh_config file.
In the user-specific config file: Typically, you will create the entry for the private key in the $HOME/.ssh/config file. Use the following command to create a file named config with the IdentityFile information as its content:
echo IdentityFile <full path to keyname> >> configFor example:
echo IdentityFile /export/home/user/.ssh/mykey >> configThis command will write the IdentityFile key word and the full path to the private key to the config file. If the config file does not exist, it will be created.
In the global ssh_config file: The global ssh_config file is typically located in the etc/ssh directory. If you must create the IdentityFile entry in the global ssh_config file, use the following command:
echo IdentityFile <full path to keyname> >> ssh_configConvert the public key to the proper format - version 6.x only
If you are connecting to Reflection for Secure IT Server version 6.x, after you generate the key pair in OpenSSH client, you must convert the public key to the proper format prior to uploading it to the version 6.x server. Beginning in version 7.0, this step is no longer needed.
Use the following command to convert the OpenSSH public key to IETF SECSH format, the format required by the Reflection SSH Windows or UNIX Server:
ssh-keygen -e -f <keyname>.pub > <keyname2>.pubNote: It is advisable to give <keyname2>.pub a unique name to distinguish it from <keyname>.pub. For example:
ssh-keygen -e -f id_dsa.pub > id_dsa_secsh.pubUpload the public key to the server
- Make an SFTP connection using password authentication from the OpenSSH client to the system running Reflection SSH Windows or UNIX Server:
sftp <user>@<host>- If you are connecting to the Reflection SSH UNIX server, change the directory to /$HOME/.ssh2:
cd /home/joe/.ssh2If you are connecting to the Reflection SSH Windows server, change to the User key directory defined in Configuration > Authentication > Public Key in Reflection for Secure IT Server console. The default is %D/.ssh2, where %D string points to the user profile folder:
Windows Server 2008: \Users\<username>
Windows Server 2003: \Documents and Settings\<username>
Enter the command:
cd C:\Users\joe\.ssh2Note: If the .ssh2 directory does not exist in the /$HOME directory on UNIX, or in the user profile folder on Windows, you must create it:
mkdir .ssh2- Upload the public key from OpenSSH client to the Reflection SSH server:
put <keyname>.pubReplace <keyname>.pub with the name of the public key you created on OpenSSH client, for example:
put id_dsa.pub- Use the quit command to close the sftp connection.
Create the authorization file on the server
An authorization file containing the public key file name must exist on the server. If it does not exist, you must create it. Follow these steps to create an authorization file:
- Using password authentication, make an SSH connection from the OpenSSH client to the Reflection SSH Windows or UNIX Server:
ssh <user>@<servername>- From your home directory, change to the .ssh2 directory where you have uploaded the public key:
cd .ssh2- Enter the following command to create (or append to) the authorization file:
echo Key [keyname.pub]>>authorizationReplace [keyname.pub] with the name of the public key you created using the key generation utility above, for example, echo Key id_dsa.pub>>authorization
- Confirm that the authorization file is correct.
On a Windows server, enter the command: type authorization
On a UNIX/Linux server, enter the command: cat authorization
- Disconnect your SSH connection.
You should now be able to connect with SSH, SFTP, or SCP from the OpenSSH client to the system running the Reflection SSH server without being prompted for a password.
Troubleshooting
If you have trouble connecting, check the troubleshooting suggestions listed below.
Verify that public key authentication is enabled and confirm the user key directory
Public key authentication must be enabled on both the client and the server.
On the OpenSSH client for UNIX:
Public key authentication is enabled by default in OpenSSH client. Check if PubkeyAuthentication no is set in the user's config file (/$HOME/.ssh/config) or the system-wide /etc/ssh/ssh_config file. An entry in the user's config file will override the same entry in the system-wide ssh_config file. If public key is set to no in these files, set PubkeyAuthentication yes.
On the Reflection SSH Windows Server:
Follow these steps to verify that public key authentication is enabled on the server:
- Click Start > Programs > Attachmate Reflection > Reflection SSH Server Configuration.
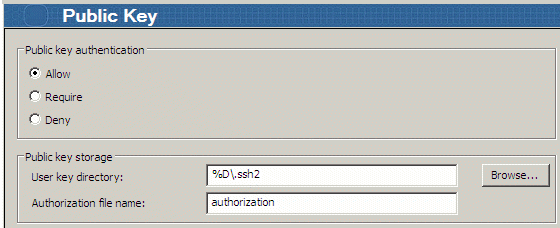
- Click Configuration tab, and go to Authentication > Public Key in the left pane.
- Verify that "Public key authentication" is set to Allow. Allow is the default.
- Verify the public key storage. By default, the user key directory is set to %D\.ssh2, where %D points to the user profile folder:
Windows Server 2008: \Users\<username>
Windows Server 2003: \Documents and Settings\<username>
If you have created Subconfiguration, check the Public Key pane within the subconfiguration window from the server console.
On the Reflection SSH UNIX Server:
The server configuration file, sshd2_config, generally located in /etc/ssh2/, should include entries similar to the following:
AllowedAuthentications=publickeyAuthorizationFile=%D/.ssh2/authorizationUserConfigDirectory=%D/.ssh2Verify that the public key was uploaded and entered into the authorization file
The public key should be present in the .ssh2 folder in the user's home directory on UNIX or User key directory defined on Windows server or the sshd2_config file in UNIX. Verify that you transferred the public key, <keyname>.pub, to the server. Also, verify that the authorization file exists in this directory and contains a Key entry pointing to the public key file. The file name must match exactly.
Key id_dsa.pubWorking with multiple hosts and key pairs—an example
If you are working with multiple hosts and key pairs, each key requires a separate entry line in the appropriate file—config or authorization. The following example shows the required entries for Host A to connect to Hosts C or D, or for Host B to connect to Host C:
| Host A config file (client) | Host B config file (client) |
| IdentityFile /export/home/user/.ssh /id_dsa_1024_a | IdentityFile /export/home/user/.ssh /id_dsa_2048_a |
| IdentityFile /export/home/user/.ssh /id_dsa_1024_b | |
| Host C authorization file (server) | Host D authorization file (server) |
| Key id_dsa_1024_a.pub | Key id_dsa_1024_b.pub |
| Key id_dsa_2048_a.pub | |