Environment
Reflection for UNIX and OpenVMS 2014
Reflection for UNIX and OpenVMS 2011
Reflection Standard Suite 2011
Reflection for UNIX and OpenVMS version 14.x
Reflection for HP version 14.x
Situation
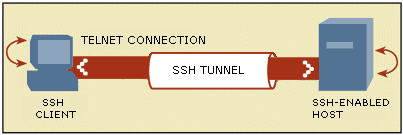
This technical note briefly describes Secure Shell (SSH) and explains how to configure Reflection for Telnet port forwarding, by creating a telnet connection through a secure SSH tunnel.
Note the following:
- If your server and application both support SSH, there is no need to tunnel a non-secure protocol. Simply use Secure Shell to establish a direct secure connection between your client application and server.
- This technical note specifically addresses tunneling telnet; however, the process described can also be used to tunnel other non-secure protocols when no direct SSH connection is available.
Resolution
A Brief Introduction to SSH
SSH is a set of computer applications based on the IETF Internet-Draft for the Secure Shell protocol. SSH provides strong, encrypted authentication and a secure encrypted tunnel through which users can execute commands and move data. The current version of Secure Shell is ssh-2. (The ssh-1 protocol is deprecated; therefore, it is highly recommended that you use ssh-2.)
For more information about Secure Shell, see "Fortified SSH: A Cost-Effective Way to Safeguard Your Network" on the Attachmate web site at https://www.attachmate.com/WhitePapers/Literature_0954.htm.
Using Reflection Secure Shell Client for Secure Connections
The Reflection Secure Shell Client is included in Reflection version 12.0 or higher.
To tunnel a Telnet session through an SSH connection, you must establish the SSH connection, then configure Reflection to redirect Telnet through the SSH tunnel. To do this, you must create two Reflection settings files, one to configure and start SSH, and one to configure and start the Telnet session.
Note: Both connections must remain open for port forwarding to be available. The SSH connection window may be minimized. If the user tries to log off or close the SSH connection while the Telnet session is being tunneled, they will be unable to do so. The SSH session will remain open until the Telnet session is terminated.
Step IâCreate the SSH Connection Settings File
Follow the steps below (for the appropriate Reflection product) to create a settings file that opens a Secure Shell connection to your secure host.
For Reflection 2014 or Reflection 2011
- Verify with your host administrator that an SSH daemon (sshd or sshd2) is running on the host computer.
- Start the Reflection Workspace, select an IBM or VT terminal template, and then click Create.
- Select the Secure Shell radio button.
- Enter the Host name and your User name.
- Select the Configure additional settings check box, and then click OK.
- Click Set Up Connection Security.
- On the Tunneling tab, under Local Forwarding, click Add.
- In the "Forward local port" field, enter the local Telnet port. The example below uses port 1025. Port numbers higher than 1025 are user-defined ports. Using ports 1 â 1024 requires administrative privileges.
- Under Destination Host, in the Name field, enter localhost, and in the Port field, enter 23.
Important: Localhost is used for the remote machine if the Telnet server you are connecting to is running on the same server where the SSH daemon resides, which is often the case.
If the SSH daemon resides on a different host than the host you are connecting to with Telnet, enter the name of the host you are connecting to with Telnet in the 'to remote' field. In this instance, the telnet connection between the Reflection Secure Shell client and the SSH daemon is secure, but the Telnet connection between the SSH daemon and the target host is not secure.
- Click OK > OK > OK.
- To verify that you can successfully establish the Secure Shell connection, log in to the host. Once successfully connected, click Disconnect.
- Click the Save icon. Enter a descriptive file name for this Secure Shell connection and click Save.
For Reflection 14.x
- Verify with your host administrator that an SSH daemon (sshd or sshd2) is running on the host computer.
- Start Reflection.
- Click Connection > Connection Setup.
- Under Connect using, select Network and Secure Shell.
- Under Connection options, enter the Host name, your User name, and then click Security.
- Click the Tunneling tab. Under Local Forwarding, click Add.
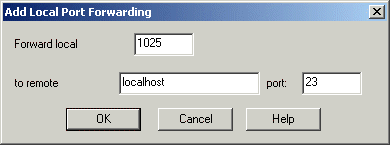
- In the 'Forward local' field, enter the local Telnet port. The example below uses port 1025. Port number 1025 or higher are user-defined ports. Using ports 1 â 1024 requires administrative privileges.
- In the 'to remote' field, enter localhost, and in the 'port' field, enter 23.
Important: Localhost is used for the remote machine if the Telnet server you are connecting to is running on the same server where the SSH daemon resides, which is often the case.
If the SSH daemon resides on a different host than the host you are connecting to with telnet, enter the name of the host you are connecting to with telnet in the 'to remote' field. In this instance, the telnet connection between the Reflection Secure Shell client and the SSH daemon is secure, but the telnet connection between the SSH daemon and the target host is not secure.

Figure 2 - Add Local Port Forwarding
- Click OK to close dialog boxes and return to the Connection Setup dialog box.
- Click Connect and verify that you can successfully establish the Secure Shell connection. Once connected, click Connection > Disconnect.
- Click File > Save. Enter a descriptive file name for this Secure Shell connection and click Save.
Step IIâCreate the Telnet Connection Settings File
Follow the steps below to create a settings file that starts a Telnet session over the port that you have redirected to connect through SSH.
For Reflection 2014 or Reflection 2011
- In the Reflection Workspace, click the New Document icon.
- Select a template and then click Create.
- Select the Telnet radio button.
- In the "Host name / IP address" field, enter localhost.
- In the Port field, enter port 1025 (or whatever port number you configured in step I-8 above), and then click OK.
- Click OK in the "Host: localhost" error dialog box. (The error occurs because the SSH connection settings file is not currently loaded.)
- Click the Save icon. Enter a descriptive file name for this Telnet connection and click Save.
For Reflection 14.x
- Open Reflection and then click Connection > Connection Setup.
- Under Connect using, select Network and Telnet. In the 'Host name' field, enter localhost, and then click More Settings.
- On the General tab, select TCP port 1025 (or whatever port number you configured in step I-8 above), and then click OK.
- Click File > Save. Enter a descriptive file name for this Telnet connection and click Save.
Step IIIâTunnel the Telnet Connection through the SSH Connection
Once you have created the Secure Shell and Telnet settings files, follow these steps to tunnel Telnet through the secure pipe.
- Double-click the Secure Shell settings file you saved in Step I-12 (Reflection 2014 or 2011) or Step I-11 (Reflection 14.x).
- Enter your password. An SSH connection is established.
- With the SSH connection established (you may minimize the Reflection window, but do not close it), double-click the Telnet settings file you saved in Step II-4. A Telnet session will be started through the SSH tunnel.
- Enter your user name and password.
Verify the Secure Connection
Follow the steps below to verify that your Telnet session is running through the SSH tunnel.
- Click Start > Run.
- In the Open field, type cmd, and then click OK.
- In the Windows Command window, type netstat.
Note: If the netstat command is not recognized, navigate to the C:\Windows\System32 directory and enter the command again.
If the port forwarding is successful, you should see a response similar to the following:
Active ConnectionsProto Local Address Foreign Address State TCP MY_PC:2460 my.server.com:22 ESTABLISHED TCP MY_PC:1025 localhost:2461 ESTABLISHED TCP MY_PC:2461 localhost:1025 ESTABLISHED |
In the example above, the first TCP row shows the SSH connection from port 2460 (a random port) on the workstation to port 22 (the default SSH port) on the SSH server.
The second and third TCP rows show the Telnet connection between port 1025 on the workstation, the port that has been configured to redirect Telnet connections (port 23) through the SSH tunnel (port 22), and a random port (2461) on the SSH server.
Note: If the second or third row shows the actual host name, such as my.server.com, instead of localhost, the tunnel has failed and the Telnet connection is not encrypted.

