Environment
Reflection for the Web 2011 (All Editions)
Reflection Security Gateway 2014
Situation
This technical note outlines some of the factors to consider when you want to provide support for load balancing in your Reflection for the Web or Reflection Security Gateway environment. The information provided is a general overview; the specifics for your environment may vary.
This technical note covers the following topics:
- Sample configuration designed to provide support for load balancing.
- Links to resources that outline the general steps for installing Reflection for the Web to support load balancing.
- Special considerations when configuring load balancing.
- Basic overview of how Reflection for the Web connects to a host with and without a security proxy server.
Resolution
Load Balancing Support Sample Configuration
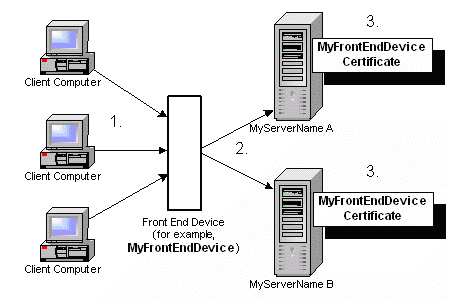
In our example, providing load balancing support requires that a front-end device (for example, a load balancer, domain name server, proxy server, firewall, router, or switch) be added to the network. This device (named MyFrontEndDevice in this example) determines to which server a client will connect (named MyServerNameA and MyServerNameB in this example.) The servers below represent either web servers or security proxy servers. Either server or both can be load balanced.
- Client computer connects to MyFrontEndDevice.
- Front-end device determines with which identical server, MyServerName A or MyServerName B, a client will communicate based on load balancing rules. (For specific configuration options, refer to the front-end device's documentation.)
- MyServerName A and MyServerName B are configured identically to provide load balancing. The common name in the certificate on each server must match the name of the front-end device. The name of the front-end device can be the fully qualified name, the NetBIOS name, or the ip address of the device, depending on how the device is being accessed.
If the servers are security proxy servers and "server identity verification check" is enabled (the default value), name mismatches cause authentication failure and the terminal session will not be established. Server identity verification is configured in the Administrative WebStation, under Security Setup > Security (in versions earlier than 8.5, Settings > Security.) For increased security, keep server identity verification check enabled. See the product help for more information about this setting.
Note: For details about how Reflection for the Web connects to a host and how certificates are used, see subsequent sections, Connecting to a Host and Connecting to a Host through a Security Proxy Server.
Installation Instruction Links
You can use the replication feature to make Reflection for the Web and Reflection Security Gateway administration easier in a load balanced environment. For details, see Enabling and Configuring Replication.
Special Considerations When Configuring Load Balancing
Note the following considerations when you configure load balancing:
- Load balancing the metering server is not recommended. When metering is configured, the emulator applet on the client sends a periodic heartbeat to the metering server. If the metering server is load balanced, the heartbeats may be directed to different servers, causing failure of metering for the session. A sticky rule on the load balancer may work around this issue, although a sticky rule may have negative consequences for the other servers. Also, note that metering reports would be created on each server, so their data would need to be manually combined to provide accurate information on usage.
- Load balancing is not recommended for FTP connections going through the security proxy. An FTP session opens three connections: data channel, control channel and notification channel. All three connections must be routed through the same security proxy server. A sticky rule may work around this issue, but may have negative consequences. Contact Micro Focus Technical Support for more information on configuring secure FTP session with load-balanced security proxy servers.
- The Administrative WebStation should not be load balanced. Use the direct IP address of one of the servers when accessing the Administrative WebStation.
- It is not possible to load balance web servers if Single Sign-on (SSO) macros are being used. The credentials store associated with SSO macros cannot be synchronized among multiple management servers.
For more information, see the Single Sign-On Overview help topic in Reflection for the Web 2011. (On Administrative WebStation Home, under Reference click Overview > Single Sign-On Overview.)
- If the web server's access control method is NTFS file permissions, when you initially configure the management servers, configure access control on each server. Do not copy the Tsessions.mdb file from one server to another, either during initial configuration or for maintenance purposes. If you make changes to sessions on the primary management server, copy the modified .asp files from the ReflectionData\AccessControl\dynamic and ReflectionData\AccessControl\static folders to the other server. Then set the file permissions on .asp files.
Optional Background Information
The following topics provide information about how Reflection for the Web and Reflection Security Gateway makes host connections. This basic overview of Reflection's host connection process may help you understand the factors to consider when you configure support for load balancing.
Connecting to a Host
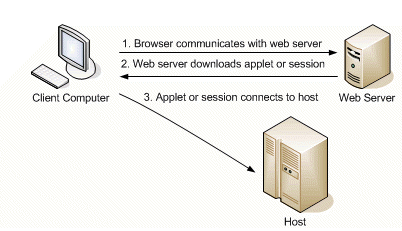
Reflection uses a three-step process to connect to a host.
- The client computer uses a browser to communicate with the web server. If the connection to the web server is HTTPS, the client browser will attempt to authenticate the SSL server certificate of the web server. A certificate warning message will occur if the certificate is not trusted by the browser, if the certificate has expired, or if the common name of the certificate does not match the server name in the URL.
- The web server downloads the Reflection for the Web applet or session configuration to the client.
- The Reflection for the Web applet or session connects to the host.

Connecting to a Host through a Security Proxy Server
- When the Reflection management server on the web server and the security proxy server are configured, they exchange certificates so that each server has the certificate information of the other. After the exchange, the security proxy certificate is stored in the Emulator Applet Trusted Certificate Store on the management server. The management server certificate is stored in the Trusted Certificate Store of the security proxy server.
- The browser makes an HTTP or HTTPS connection to the web server which hosts the management server. If an access control (other than None or NTFS file permissions) method is configured, the management server checks the credentials of the client. When the credentials are verified, the management server allows access to sessions authorized for this client.
- A session is selected in one of two ways: the client makes a selection from the Links List or the URL launched by the client contains the session parameters.
The management server sends to the client: the Reflection for the Web emulator applet, the session configuration information, the authorization token, and the trusted certificate store which contains the security proxy certificate. The authorization token contains the name of the destination host and port and is signed with the management serverâs certificate.
- When connecting through the Reflection security proxy server, two different authentications are performed. One authentication uses the security proxy server certificate and the other uses the Reflection management server certificate.
- Security Proxy Server Certificate: The emulator applet initiates the SSL handshake with the security proxy. The security proxy server sends its certificate to the applet on the client machine. To verify that the security proxyâs certificate is trusted, the applet checks its cached trusted certificate store (the one that has been downloaded from the management server). If "server identity verification check" is enabled (in the Administrative WebStation, Security Settings > Security tab), the applet will also check the common name of the certificate against the name/ip address used to contact the security proxy. If the security proxy certificate and common name are verified, the applet successfully authenticates the proxy server and the process proceeds to the second authentication.
- Management Server Certificate: This authentication uses the authorization token downloaded from the management server. This step occurs only if "Client Authorization" is enabled in the security proxy server (the defaultâconfigured on the Advanced Tab of the Security Proxy Wizard). The emulator applet forwards the token to the security proxy server. The security proxy server verifies the signature against its trusted certificate store, which contains the management serverâs certificate. Once the security proxy server authenticates the management server as the source of the authorization token, the security proxy server knows that the management server authorized this client to connect to the destination host and port identified within the token.
- When the authentications are successfully completed, the security proxy server connects to the host and the terminal session can begin.

