Environment
Redline 3.x
SLES 9, 10
Situation
How do I setup Redline to monitor GroupWise using the Redline Agent installed on the Control Center? The documention says I can use one Redline Agent to monitor all of GroupWise. How do I do that? Is this the recommended setup for Redline? What are the disadvantages of monitoring GroupWise using this method?
Resolution
Redline can be setup to monitor a GroupWise system remotely using one single Redline Agent. This method allows for Redline to be completely deployed on one single server, freeing up resources on other servers. However, there are some drawbacks with this method of setup and is generally discouraged. Some of the reasons are as follows:
- No monitoring of each server host. Information about server volumes, and notifications of the server going down are not possible in a remote setup.
- Additional strain is placed on the remote Redline Agent to get all data for the entire environment. This can sometimes lead to long loops retrieving data resulting in possible false alerts.
- This method also relies on a connection to (mount) the remote filesystems or volumes. If this mount fails, or the server is restarted (if the mount isn't permanent), then the Redline Agent will be unable to collect the necessary logfiles for reports. This effects the accuracy of the reports.
SETUP:
1) Pre-configure all agents that are to be monitored by Redline. Using the documentation as a guide, enable HTTP web access, verbose logging, gwchecks, etc.
2) Verify HTTP access as per documentation.
3) Install the Redline rpm on supported Linux OS and startup the Control Center. Do NOT start the Redline Agent at this time.

4) Configure the /opt/beginfinite/redline/conf/rlagent.conf by opening the file in a text editor such as kwrite, gedit, vi, etc.
5) Remove the NEWINSTALL line in the conf file.
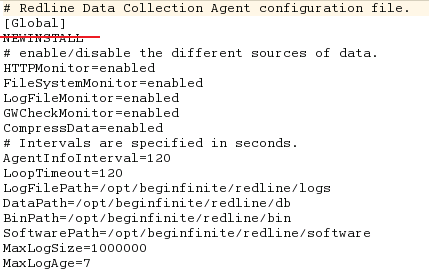
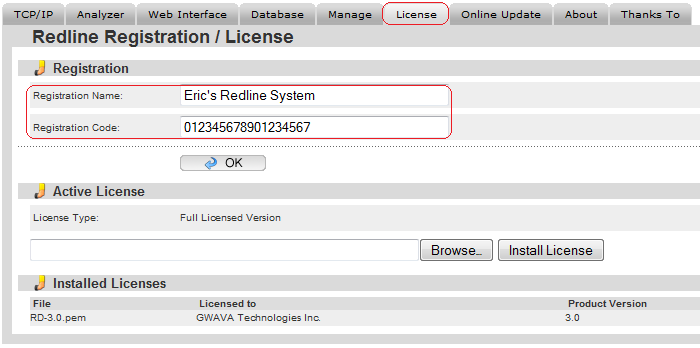
6) Input the correct information for the Control Center. Most likely this will involve a loopback IP address, plus registration key and code. You can make the key and code whatever you wish. It is configured in the License section of the Redline web interface. The key and code in the configuration file must match exactly.
.png)
7) Enable all necessary agents, add additional if necessary. Disable or remove all unused agents.
.png)
NOTE: In this example the [POA] section is listed twice. This is because there are two post offices to monitor. Copy and paste each section as necessary to monitor all agents in your environment. Also note that the GWAVA configuration that is in the rlagent.conf file by default references GWAVA version 3. To set the Redline Agent to connect to GWAVA 4, edit the GWAVA section to look like the GREEN box in the picture above. Note the bracketed title. A GWAVA user, "redline" was created for Redline to connect to.
MOUNT VOLUMES:
Each volume that contains a logfile that Redline imports must be mounted to the remote Redline server. If several logfiles are on the same volume, that volume need only be mounted once. This article assumes a NetWare or OES NSS volume mount.
NOTE: The NCPMOUNT command used in step 9 is a temporary mount. Resetting the server will dissolve this mount. It may be necessary to create a script of some sort to mount each server automatically on restart. It may be necessary to add the -P flag to include a password to allow mounting without user interaction.
8) Create a directory on the Redline server where the remote filesystem will be mapped (mounted) to. In this example, from a terminal, type "mkdir /mnt/mail". It is important that the directory is empty and that you are not in the directory at the time of mounting.
9) Use the ncpmount command to connect and map the remote NetWare filesystem to the newly created blank directory. In this example, from a terminal (substitute your appropriate system information), type "ncpmount -A 10.1.3.50 -S MULTIVERSE -U admin.users -V mail /mnt/mail". To mount multiple volumes, create additional empty directories, and mount the servers as necessary.

ncpmount -A 10.1.1.1 -S NW65_SERVERNAME -U admin.context -V gwvol /mnt/gwvolmnt
-A IP Address
-S Server Name
-U User name + context
-V NetWare volume that is being mounted (gw7vol)
/ Mount directory on the Linux server (/gwvolmnt)
-P (optional) Password to server mounting to. If not included it will prompt.
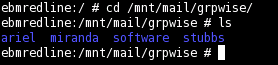
10) Change directory to the mounted directory, and verify that the data can be seen.
ADDITIONAL INFORMATION:
* If you are getting an error with ncpmount that it doesn't exist, it may be necessary to install the ncpfs package through YaST then try again.
For additional help with mounting NetWare volumes to Linux servers, click here.
For additional help with mounting remote Linux directories to Linux servers, a google search should help.
To mount NSS volumes that are on a Linux OES server, to a Linux server, use the NetWare mount above.
11) Open the properties of one of the POA objects in ConsoleOne, and set the Redline Scheduled events to kick off soon. The GWHCHECK events scheduled for the post office(s) that should have been setup in step 1. It will likely take some time for these files to be produced. When they are complete, they will be placed in the <post_office_dir>/wpcsout/chk folder.

12) Start the Redline Agent.
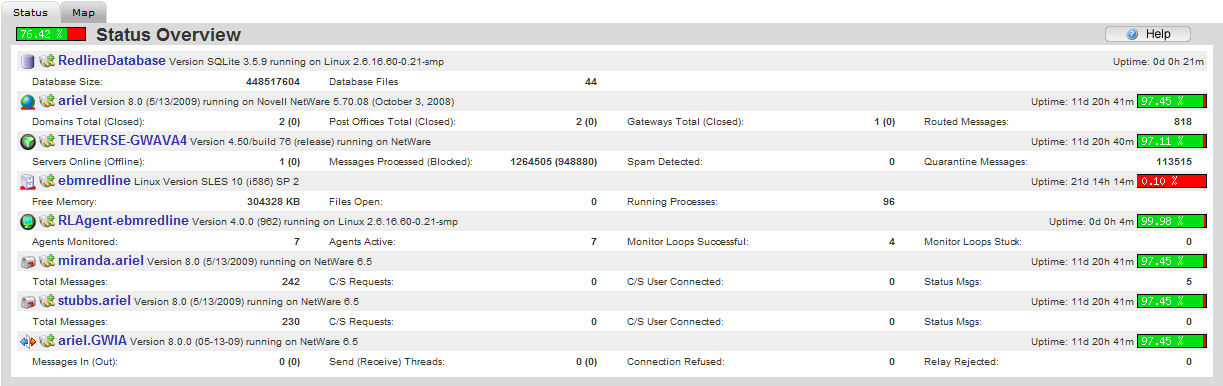
13) Verify all of the agents configured above register with the Control Center. Log into the web interface for Redline and click on System View. A few of the supported agents Redline can monitor do not have HTTP access so they won't show at this time. All GroupWise agents have HTTP support, and most GWAVA products do as well. All GroupWise Agents should show.
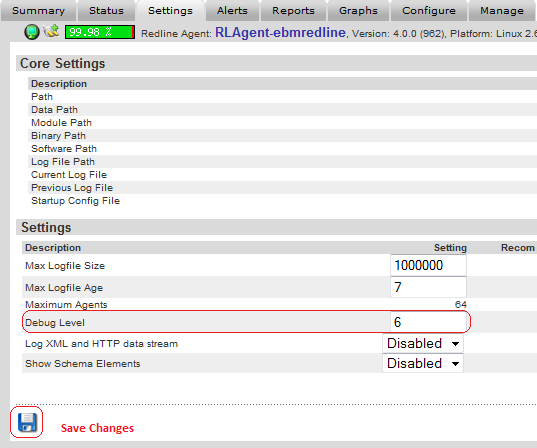
14) Click on the Redline Agent, and then click the Settings tab. Set the Redline Agent to Debug Log level 6. Click the disk icon to save the changes.
15) Allow the Redline Agent to loop 2-3 times (6-8 minutes).
PATHTAB CREATION:
The steps below show how to setup the pathtab to retrieve the GWCheck files setup for Redline. The troublshooting section further down may help with setting up the pathtab file for the retrieval of other agent logfiles.
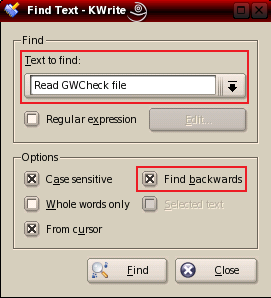
16) Open the /opt/beginfinite/redline/log/rlag.log file. Search from the bottom up for "Read GWCheck file". The result shows that the Redline Agent is looking for the GWCheck file(s), which it does every loop. If it finds a file to import, it will report in the log that is has "Found special file". We know there are some, because in step 11 we verified they are sitting in the CHK folder. This indicates that Redline needs to be directed to where the logfile is located locally. When Redline connects to GroupWise agents, one of the variables it gets is the logfile location. This location is in the form of SERVER\VOL:\PATH on a NetWare server. The Linux server that Redline is on doesn't know what that path is. To translate the NetWare path provided by the GroupWise system into a path the Linux can see through the mount, a file called "pathtab" is created to translate the mapping.
From the excerpt in the rlag.log file above, we see where Redline thinks that the GWCheck logs should be, THEVERSE/mail:\grpwise\stubbs/wpcsout/chk. However, because the Redline Agent is not located on the GroupWise system, it does not have the ability to retrieve the log files using that path. In the picture below, we can see the GWCHECK files appear to be available locally using the mount.

Thus, we conclude that the Redline Agent needs to know that everytime it sees "THEVERSE/mail:" that must be translated into "/mnt/mail". This is where the pathtab file comes in. The pathtab file performs this translation.
17) Create the "pathtab" file. Open a terminal on the Redline server and change directory (cd) to the /etc directory.
18) If there is currently no pathtab file, one must be created. From a terminal, type cd /etc directory. Then touch pathtab. That command creates a blank text file. Open the file with a text editor to add entries.
19) Add the pathtab information. Input the local mount location first, then the volume. It's fairly simple to see that whenever Redline sees what is on the right, THEVERSE/mail, it will replace with what's on the left, /mnt/mail/.
NOTE: Continue to modify the pathtab file, using the /opt/beginfinite/redline/logs/rlag.log file as a guide, until the files disappear from the /wpcsout/chk folder on the live system. The Redline Agent need not be restarted after a change is saved to the pathtab file, but it will need to loop at least once for the changes to take effect. Once the files disappear, the Redline reports should start to populate shortly thereafter. Do this for the logfile paths for each of the agents as well using the rlag.log as a guide.
TROUBLESHOOTING THE PATHTAB:
It is not uncommon to have some trouble getting the pathtab setup. This is where the debug logs for the Redline Agent (rlag.log) are invaluable. When working with the pathtab file there are a couple of time saving things to know.
a) The pathtab file may be edited without shutting down the Redline Agent. Just save your changes to pathtab file and wait for the Redline Agent to loop.
b) Opening another terminal window and tailing the /opt/beginfinite/redline/logs/rlag.log file will help with quick observation of changes. (tail -f /opt/beginfinite/redline/logs/rlag.log)
c) Each monitored agent will have a log file that the Redline Agent must retrieve for reports and possibly alerting. Most likely each may have a different variation of how it reports the log file path. It is necessary to look through the log, and take each agent one-by-one, adding pathtab entries as necessary. Some trial and error will be required.
EXAMPLE 1:
The /etc/pathtab file shows the following, but the Redline Agent is still not importing the GWCHECK files.
Using the /opt/beginfinite/redline/logs/rlag.log, find the section for the post office, and search for the line "Read GWCheck file:"
Here we can see that the correct path from the pathtab was substituted, but it is missing a "/". Edit the /etc/pathtab file to display the following, save the changes.
After waiting for the Redline Agent to loop, open the /opt/beginfinite/redline/logs/rlag.log and find the post office section again. Notice now, that the path through the local mount is now correct, and the Redline Agent "Found special logfile" to import.
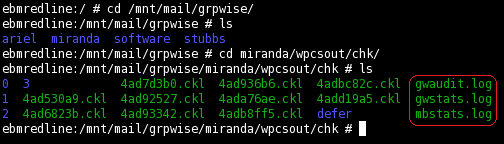
Changing directory to the locally mounted GroupWise post office directory, we can see that in the first picture Redline has picked up 2 of the 3 gwcheck files, and a directory listing a short time later (the lower picture), reveals that all gwcheck files have been picked up and sent to the Control Center for processing.
EXAMPLE 2:
Using the /opt/beginfinite/redline/logs/rlag.log file once again, look through the various section of each monitored agent. Look for the "Current Logfile". A path should be displayed. If it shows a path that is not through the mount on the Linux machine, a pathtab entry must be made or modified.
excerpt 1 - gwia logfile location as shown in the rlag.log file.
excerpt 2 - gwava 4 logfile location as shown in the rlag.log file

excerpt 3 - MTA logfile location as shown in the rlag.log file. This one is correctly configured.
Based on the information in the rlag.log file, the following additional lines were added to the /etc/pathtab file.
Additional Information
This article was originally published in the GWAVA knowledgebase as article ID 1499.